File Parsing & Data Validation with Python
Why
Testing is, to be honest, the typical developers least favorite phase in the development cycle, and data validation is probably the worst part of it. Even simple outbound integrations can require a great deal of tedious, time consuming file auditing.
Suppose you need to extract a value from a certain position in a fixed width file, or from a certain column in a delimited file, and compare it to report data. For a one-off validation, you can do this with excel's text import tool, but in most cases you'll have to repeat the import process with each new file. (Apparently there's a way to save and reuse an excel import template outlined here https://blogs.office.com/2010/06/10/importing-text-files-in-an-excel-sheet/
but the process appears to be kind of cumbersome.)
Fortunately, Python has a few pre-built libraries and tools that make text file parsing relatively easy. If you're willing to open a text editor and do a bit of scripting, you can create a reusable tool for reading and validating file data. Save it alongside your XSLT, studio code, and/or report definition and your colleagues will have a pre-built testing framework that should cut a substantial amount of time and effort from the test phases of future integration projects. This is also a great way to spur Python uptake in your organization. Just sayin'.
Lets get started
To follow along here, you'll really just need the python binaries, downloaded here: https://www.python.org/downloads . Oh, and your favorite text editor.
Once the install is complete, you may want to add the 'python' executable to your path environment variable (Start->Computer->Properties->Advanced System Settings->Advanced Tab-Environment Variables) for convenience. Once that's done, all you'll need to do to execute a program is save your code file (a .py extension is customary) and type 'python [filename]' into a command prompt in your working directory.
Lets look at the first few lines of a typical script:
import sys
import re
import struct

for line in open(sys.argv[1], 'r'):
for line in open(sys.argv[1], 'r'):
More tools
For fixed width files, the struct module is great for reading a set number of characters into one or more variables based on the position in the line. Originally designed for reading byte-by-byte binary data, it's featureset makes it easy to read a read fixed numbers of characters at fixed positions into variables as strings, integers, etc. the general gist is that you'd specify a format string for a line, for example: '40x10s' would tell the struct module to skip over the first 40 characters, and read in the next 10 as a string. Pass this format to a newly created Struct object and create an intermediate compiled result object, and any string you pass into the 'result' method will be transformed into a list of data elements, as follows:
import struct

input_line = '                    FIRSTSTR**   SECONDSTR*'
line_format = '20x10s3x10s' # skip the first 20 chars, read the next 10 into a string, skip 3 more, read the last 10 into another string
fieldstruct = struct.Struct(line_format)
result = fieldstruct.unpack_from
[first_string, second_string] = result(input_line)
At this point you may already be familiar with regular expressions in XSLT, Xpath, or any number of other languages, and if you're looking to capture a line or portion of a line conditionally based on the presence of a particular piece of text, python offers regex support on par with what you'd find anywhere else. The usage is pretty straightforward as well - import the 're' module along with your other imports, and use the 'match' or 'search' methods to return a true value if an input string matches the regular expression you've provided, or 'findall' to return a specific list of phrases from your string that match your regex. As a simple example:
import re

re.match('^ABC', input_line)Tying it together
Let's take a look at a practical example. I'm sure some of you will recognize this type of file right away, and groan:
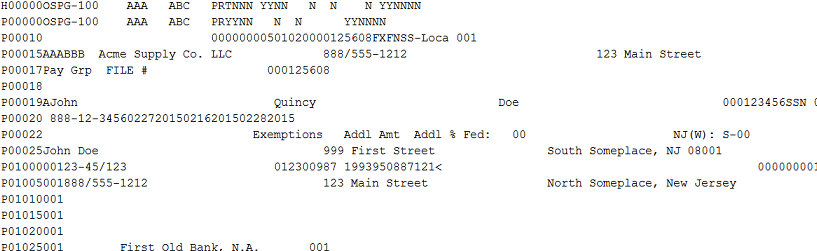
For the uninitiated, this is what an ADP PSS file looks like - A file-level header, followed by up to around 30 per-worker lines, and one or two file trailer records. (Yes, it's completely anonymized.) While the lines themselves are fixed-width, but the number of lines for each payment can vary based on a number of factors (your tenants payroll setup, the number of lines on the paystub, etc.) The best strategy here is to look for the specific lines contining the data you're interested in based on the line record ID in the first six characters of the line, and then read the data at specific positions in the line based on the ADP provided file specification.
For example, if you wanted to read a workers legal name as it appears on the check, You'd look for the P00025 record and read characters 7 through 46, and if you wanted the check date, you'd look for positions 19 through 26 on the P00020 record.
Suppose you wanted to extract a list of payee names given a PSS file for audit purposes - you'd use a code block something like this:
for line in open(sys.argv[1], 'r'):
if re.match('^P00025', line):
	fmt = '6x40s' # skip 6 characters, read the next 40
	fieldstruct = struct.Struct(fmt)
	result = fieldstruct.unpack_from
	fields = result(line)
	worker_name = fields[1]
There's a larger demo script available here. Seriously, unit testing is painful and time consuming and with an approach like this you can 1.) save yourself a ton of repeated work from one project to another and 2.) move towards standardized unit tests, reducing the likelihood of missing errors that will burn you later.
I want to also note that there is a package for analytics called 'pandas' available, which allows for almost SQL-like aggregations on data sets once they've been read into standard structures. As I write this, the functionality for reading fixed-width files is still pretty new and probably doesn't have the flexibility you need yet (though it reads csv files beautifully.) In time I may update this post with an alternate approach. Stay tuned.
Hope this helps.
2015 @matthewrichen mrichen.github.io/wdlearn/